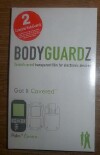
Ok, so you've heard of BodyGuardz and invisibleSHIELD, but wanted to know a bit about each and how they compare head-to-head?
Some readers in the forums were discussing which was the thinnest case or skin. Forum member Mark Bergman suggested in this thread that TreoCentral compare both products. I thought that was a great idea, so I'm comparing two of the mentioned skins for my Centro - The BodyGuardz and invisibleSHIELD.
BodyGuardz
First, I'll cover my experience with BodyGuardz.
BodyGuardz are a clear film that covers the body of your device, which protects your device from scratches. BodyGuardz is made from the same materials that is used to protect the front of your vehicle from stones and other abrasive materials while, at the same time, is transparent to allow the beauty and design of your device shine through.
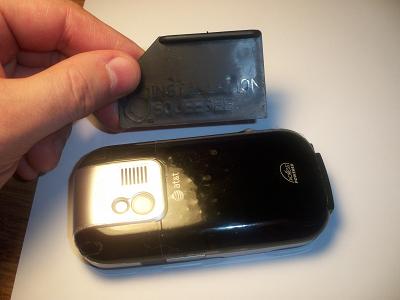
In the Box
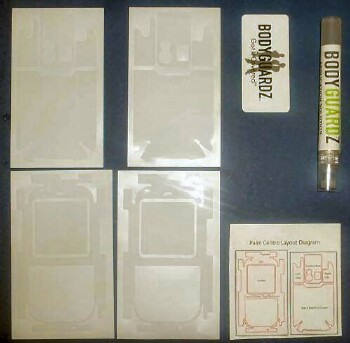
The BodyGuardz package contains 2 complete BodyGuardz, the application solution (baby shampoo and water in a spray tube), a squeegee card and application instructions. I liked the fact that the package contained two BodyGuardz, just in case I made a fatal mistake and totally ruined one in the process of applying to my Centro.
Preparation and Application
I'll go into more detail here, as most of what I say about the BodyGuardz also applies to the invisibleSHIELD, so I can kill two birds with one stone. When applying a protective film such as a BodyGuardz, it is very important to first wipe down your device to remove fingerprints, body oils and other materials which can potentially cause the film not to adhere correctly to the device and, just as importantly, to avoid sealing unsightly fingerprints under the film. Wash your hands thoroughly to minimize contaminating the film and wet your hands with the application solution to keep them wet the whole time you're handling the film. When you remove the film from its liner, spray the sticky/tacky side and remove the film slowly and carefully, avoiding letting the film stick to itself. Even more important, never let the films sticky surface touch anything other than your device, as the adhesive can pick up materials which can contaminate the film and it can't be cleaned once it's contaminated.
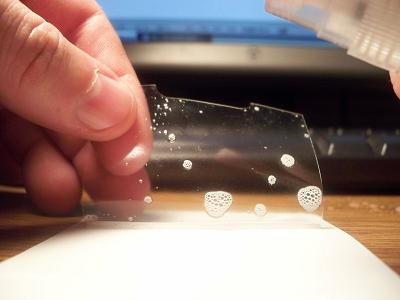
Spray the film liberally before applying to your device, which will allow the film to be moved around into the optimal position. Don't expect to simply lay the film on your device and have it easily align without quite a bit of time and effort. If you should need to remove the section, as I did, just re-sray the material and begin again - but, be sure not to let the film stick to itself, which I would imagine could be tedious to straighten out without possibly stretching the material.
Once the section is in place and optimally aligned, carefully use the squeegee card to smooth out both any bubbles that may be present and any excessive soap and water present under the film. Do this in overlapping strokes, being mindful not to push to hard to avoid scratching the film or, again, stretching the film and compromising the 'skin tight' fit.
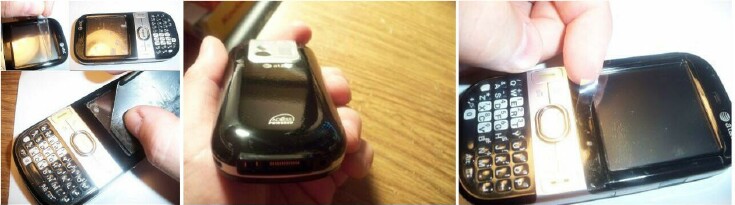
My Personal Experience
The front piece was the most challenging, as it has cutouts for both the screen and the keyboard area. I laid the section on my Centro and began to align the screen cutout around the sides of my screen. Once I was satisfied with this alignment, I worked with the area of the film which fits around the keyboard area and then aligned the film around the earpiece and signal indicator light. This all took quite some time and I had someone helping me by holding the film in place while I worked with the film to correctly align a particular area I was working with. Next, I worked with the 'corners' which are basically tabs which you 'fold' around the corners of the device. There are tabs because the film is designed to fit the device while still allowing access to areas such as the earpiece and charge plugs, etc.
For the smaller areas, the application went quickly and easily, as there wasn't the complexity of having to align the film around areas such as the keyboard. The film section which covers the battery lid also went without a hitch.
when I put the BodyGuardz on, it took quite some time - even with help from a family member. I sprayed as the directions said and the skin would still dry and become hard to move into position. So, I sprayed liberally and was able to line the skin as evenly as possible from side to side and from top to bottom. This, again, took quite some time and I was left with quite a bit of cloudy sections, which the instructions said would clear up in time. I let the skin dry for two days and it did, indeed, clear up almost entirely. While the edges didn't line up as well as I'd like, the whole look is pretty impressive, though my pictures can't quite bring that across. Along the edges, you can feel where the skin ends and the whole skin is a bit.. tacky.
Below are some of the pictures I DIDN'T lose when my hard drive fried.. whee. Glad I took a few pictures with my secondary camera - here are a few of them.

Impressions
As I mentioned earlier, my BodyGuardz film didn't quite line up, even after tediously aligning and realigning - but, the fit is acceptable and I have access to all necessary areas of my Centro without any obstruction to my charge port, storage card slot, headset jack, etc. I suppose I may have inadvertantly stretched the BodyGuardz film as I removed it from the liner and during the aligning process, but I can honestly say I took every possible precaution to avoid doing exactly that.
As for doing what the BodyGuardz is designed to do, I can say the skin does protect from everyday bumps and scratches. I am careful with my Centro, but, like all plastic devices, just laying my Centro down and picking it up can potentially sratch the plastic. I was brave and put the BodyGuardz to the test and intentionally slid my Centro along my desk as I picked it up for the 10 days I tested the film out and even accidentally bumped the corner once as I picked up my phone to answer an incoming call. After 10 days, my Centro looks awesome after simply wiping it thoroughly with a cleaning cloth! That's as far as I'd expect a film to protect my precious device, though. The BodyGuardz will provide protection from minor bumps, but, definitely don't leave your device at the mercy of the elements and dangers of the everyday world protected only by the BodyGuardz - use a bonified case to carry your trusty device around.
On to the invisibleSHIELD!
Invisible Shield by Zagg
Invisible Shield, by Zagg, is claimed to be the toughest, longest-lasting protector available, and is basically a film which covers/protects your gadget/device. Originally, this film was used to protect the leading edges of helicopter blades from wear and tear while traveling hundreds of miles per hour. Being made of a clear, urethane plastic, the film is claimed to provide unparalleled abrasion resistance. Currently, Zagg provides the invisibleSHIELD for 1000 devices and even state that if they don't have it, they'll custom make on for you. Let's put the invisibleSHIELD to the test.
In the Box
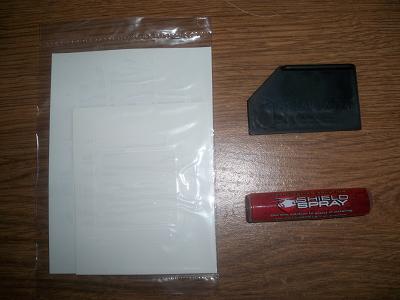
In the box, Zagg has included the invisibleSHIELD, a small red bottle of application liquid (which is basically baby shampoo and water) and a black squeegee. Of notice, the bottle of application liquid is noticeably smaller than that included in the BodyGuardz package and doesn't spray nearly as easily or evenly.
Preparation and Application
As with the BodyGuardz film, it is very important to use a clean, lint-free cloth to wipe down your device to remove fingerprints and body oils, etc. from the outer surface. I wiped my Centro down thoroughly, as I'm a neat freak when it comes to my gadgets! I'd hate to install the invisibleSHIELD and later notice I'd missed a fingerprint, which I'd have to live with or replace the shield.. ugh! When you're set to install the shield, I'd recommend keeping your fingers/hands damp and to use the application liquid liberally - as the film will be MUCH easier to move around and line up correctly. Just don't overdo it, as it will take that much longer for the film to dry and secure to your device.
As I mentioned earlier in the BodyGuardz section, great care should be taken when removing the film sections from the liners. I started on the back of my Centro, installing the battery lid section - as it's the largest and least complicated part of the installation. This way, I got a feel of just how adjustable the film is and how much liquid I'd need to use. Once I had the section free from the liner, I carefully laid the film on my battery lid and worked it, bit by bit, until I was happy with the positioning. The rubber squeegee is used to smooth out the film and 'squeeze' out as much liquid as possible, while forcing air bubbles to the side and out from under the shield. Don't expect to simply lay the invisibleSHIELD on your device and be set. You will have to devote some real time to get it positioned 'just right' and assure that the excess liquid and bubbles are removed.
The remaining sections were a bit tricker, but with time, and patience, the shield went on without a hitch. As with the BodyGuardz protector, I was a bit leery when it came to applying a wet screen protector on my Centros screen. I spent the most time squeegeeing on my screen, of course.
Zagg recommends keeping your device powered off and setting it to the side for 12 to 24 hours to allow the film to dry and adhere correctly. I have to admit, I was pretty nervous that my screen would look cloudy when I turned my Centro back on - but, it looks just fine!
My Impression and Conclusion
Overall, I'm pleased with the look of my Centro with the invisibleSHIELD on it. The film sealed nicely, and from most angles, the surface looks smooth and shiny. The screen protector looks clear and shiny, but it is tacky to the touch, as is the entire invisbleSHIELD. There is a rough feel at the edges where the film stops, but the film seems securely sealed to my Centro. Overall, the look is pleasing, though. I didn't realize it until I was wiping down my device for pictures, but my invisibleSHIELD didn't come with a section to protect the area around my keypad - very strange! I scoured over the two liners I had removed the other sections from - but, there is nothing left. Apparently, Zagg either forgot to include this in their design, or my invisbleSHIELD was just missing this section.
As with the BodyGuardz, I left the invisibleSHIELD on my Centro for about 10 days - going through my usual motions. I put the battery lid cover to the test by sliding my Centro across my desk as I would pick it up or lay it down. I nervously repeated the accidental bumping of my Centro on my computer desk I did while testing the BodyGuardz shield - man, what we do in the name of testing products hehe.
The screen protector is still intact and clear as ever after nearly two weeks. I've read posts of this type of screen protector turning yellow with age. I intend to continue using my invisibleSHIELD screen protector and will report back if it does become cloudy, yellow, etc.
On to the head-to-head comparison!
BodyGuardz vs invisibleSHIELD
Comparing the 'feel' of the BodyGuardz vs the invisibleSHIELD I find that I prefer the feel of the BodyGuardz, as it is smoother and there isn't as noticeable of an 'edge' where the film ends and the surface of my Centro is exposed. As far as the look of the film, I cast my vote for the BodyGuardz, as the invisibleSHIELD looks rougher - sort of like an orange peel would look. The screen protectors both seem very capable of protecting your device equally, something I demand in a protector! Again, there is the slight orange peel look to the screen protector as well. I believe the invisibleSHIELD may be a bit thinner when it comes down to which is the thinner of the two, but from my experience - both are proficient at keeping your mobile devices protected and, hopefully, scratch-free.
I can't find fault with either brand when it comes to their protective properties, so I suppose it comes down to the matter of look and feel, which I give my vote to the BodyGuardz film. That, plus the fact that my package of invisibleSIELD was missing a protective film for the area of my Centro below my keypad, sways my overall vote for the BodyGuardz by NLU Products!
On a side note - my sister dropped her Treo 680 this past Sunday and it scratched her device just above her volume up and down buttons. I told her I was pretty confident that if she'd had either the BodyGuardz or the invisibleSHIELD protective cover on her Treo, that most, if not all, of the damage done would have been avoided. I think she intends to purchase one or the other ASAP. I'm recommending she buys the BodyGuardz.
You can get the BodyGuardz here for $24.95 and invisibleSHIELD here for $24.95.
