|
|
|
| Mon Jun 16, 2008 - 12:42 PM EDT - By Jay Gross | |
|
|
|
People often tout the benefits of Centros and other smartphones in a single word: �email.� On the go or not, Centro sends and receives email, even with attachments, and it does the job just as well in some respects as a �regular� computer. Setting it up can be a challenge for novice users, though, so we�re off to Jay�s Explanatorium for a tutorial on getting your email in places other than your desk or office.
An up-front feature of this on-going series is that we recap in a single paragraph what we�ve covered to date. Here goes:
Beginning with Part 4 in the series, AT&T�s Centros complicated a number of issues. Those models are different from Sprint�s Centros, especially in their Phone application. My Centro is of the Sprint ilk, and I don�t have an AT&T model of my own to compare, but as we go along, I�ll try to point out any differences that I know about. Meanwhile, don�t let it bother you too much if my screenshots don�t exactly match yours. Extrapolate as needed.
A word of caution before we start. All email comes in or goes out over your cell phone carrier�s �data� network, not the normal voice network. If you�re not on an unlimited �data plan,� you�ll incur expensive per-byte charges, and you might have to mortgage your cat to pay the bill. Data service is different from text messaging, but it encompasses �multimedia� texting. Check with your carrier if you really want to get confused, but the simple explanation is: buy an unlimited data plan if you plan to do much email, remembering to count both directions - inbound and out. Sprint�s is $35 a month, give or take.
Besides email, an unlimited data plan lets you access the internet as much as you like. Nice. In my experience, as evidenced by two of my recent Sprint bills - on which a billing error stated the non-unlimited rates � there are really only two choices for data plans: unlimited, or none. All are overpriced, but that�s a topic for another time.
Gather some delectable comestibles, pour yourself a cup of strong java, fire up your Centro, and let�s begin. Our first stop: housekeeping. Remember from Part 7 that we observed, with trepidation, some system parameters by which the Centro accesses whatever data network you�re on. If you didn�t set that up, do it now or none of this will work. Actually, I strongly recommend having your carrier set it up for you � they shouldn�t charge anything, just the monthly fee. It�s too confusing for mere customers to have to deal with.
Here�s a super-quick run-through:
Network working? Delectables replenished? The next step is to set up the email account itself.
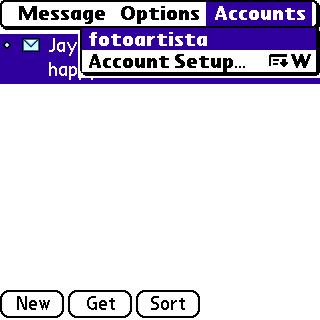
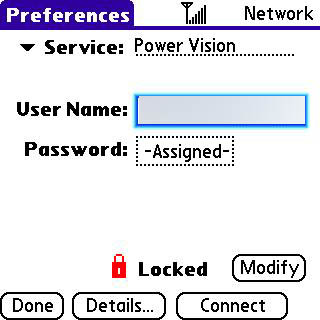
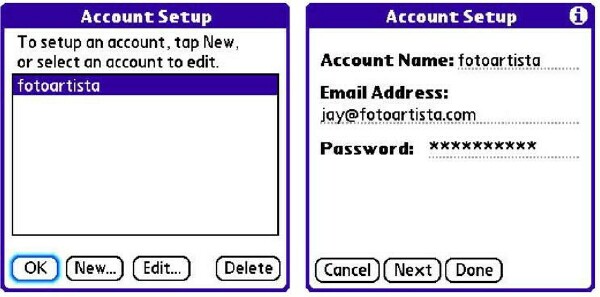
The Accounts pulldown offers a list of existing email accounts, in addition to the Account Setup option. With no email accounts, yet, only the Accounts Setup option will appear; the rest of the screen will be blank.
One more caveat. Lately, users have been reporting problems with using Gmail accounts with their Centros. If you�re having trouble with Gmail, check the TreoCentral forums for guidance and current information on this problem.
To type the �at� sign on the Centro, press the Option key (second row from bottom, far left � it has a solid square on it) once and then the �I� key. There�s no need to hold the Option key down while you press �I�.
If you need numbers and punctuation, you can get them in a similar manner. Option letter key. If you need a bunch of numbers in a row, press Option twice, and everything you type after that will be in numbers (or punctuation) until you press Option again (or till the feature times out).
Capital letters, in case your password requires them, work similarly, too. Press the Shift key (Bottom row, left side) and then whatever letter you want capitalized. The keyboard stays �shifted� only a few seconds, so if you dilly dally too long, you might have to refresh the shift. Two presses on the Shift key puts the Centro into the electronic equivalent of caps-lock mode till you press Shift again (or timeout happens). You can move the cursor within the entries by pressing Left or Right on the 5-way Navigator.
In all of the following entries, be sure to type the information exactly without leading or trailing spaces. It matters.
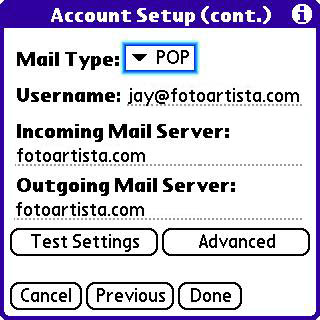
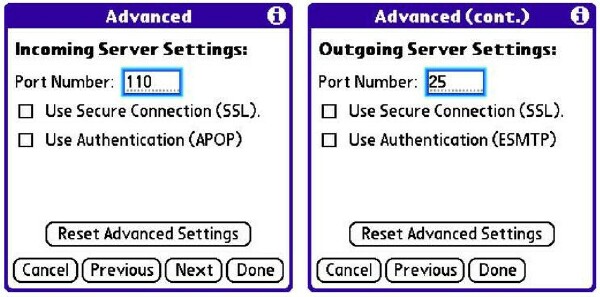
One reason this might fail is that your ISP might want some portion of the Advanced Settings specified. Tap Advanced Settings to inspect. There are two screens of Advanced Settings to confuse you. If you don�t need these, leave the defaults alone. And breathe a relieved sigh.

The result of all this is an entry in the Account Setup screen. Tap New to add more accounts if you want. If something changes for an account, you can make adjustments by tapping Edit.
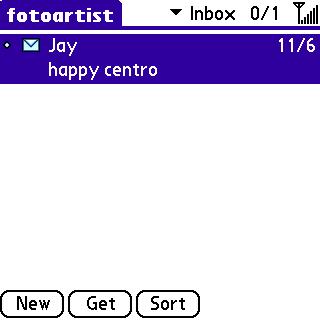
We�re back to the Email screen. With all this effort, it now has one or more accounts listed. Send yourself an email from some other account or machine, and send one out from your Centro.
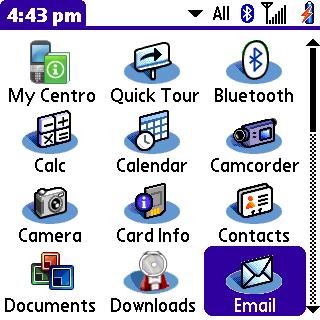
The Centro�s email application is also known as Versa Mail. It�s not the only one available, but it comes with the device. The others each have their devotees, and they all have their detractors.
We�ll explore more options and features of Centro�s email in another installment. Promise.
With massive money moving out every month for unlimited data service, we�ve set up and operated the Centro�s email application. If you have burning questions, Centro or not, email the author, and nominate them for a trip to Jay�s Explanatorium. Like everything else, email boasts many personalizable settings, but we�ll hold those for another installment in the series. Next time, next topic!
Copyright 1999-2016 TreoCentral. All rights reserved :
Terms of Use : Privacy Policy
TREO and TreoCentral are trademarks or registered trademarks of palm, Inc. in the United States and other countries;
the TreoCentral mark and domain name are used under license from palm, Inc.
The views expressed on this website are solely those of the proprietor, or
contributors to the site, and do not necessarily reflect the views of palm, Inc.
Read Merciful by Casey Adolfsson